Behind the Brush: The Process of Creating Resin Surfboard Art
Resin doesn't forgive hesitation. You have thirty minutes—maybe forty if the trade winds are gentle—to guide color across foam and fiberglass, to chase the edges where turquoise meets midnight blue, to create something permanent from something fleeting. This is the heart of surfboard resin art technique, practiced by artists across the North Shore artist collective who have learned to work with resin's particular demands, its refusal to be controlled, its insistence that you understand the chemistry before you attempt the art.
If you've watched surfboard artists like Malia Santos work their craft and wondered how to paint surfboards yourself, this guide walks through the process—not as a rigid set of rules, but as an introduction to a medium that demands both technical precision and creative intuition. This is craft that sits at the intersection of chemistry and art, where timing matters as much as vision.
What Makes Resin Different: Understanding the Medium
Resin isn't paint. It's a liquid plastic that undergoes an irreversible chemical reaction when mixed with a hardener. Once you pour it, you're committed. There's no wiping it off, no painting over mistakes, no second chances within that working window. This fundamental difference shapes everything about how you approach surfboard resin art.
Where acrylic or oil paints sit on top of a surface, resin becomes part of it. It soaks into fiberglass cloth, bonds with foam, creates a glossy, glass-like finish that's both protective and decorative. The colors you mix into resin remain translucent, allowing light to pass through layers, creating depth that opaque paints can't achieve. This translucency is why resin works so beautifully for ocean-inspired designs—you can layer blues and greens the way water layers itself, light filtering through each stratum.
The challenge is the cure time. Professional-grade epoxy resin for surfboards typically has a working window of 25-45 minutes depending on temperature, humidity, and the specific formulation. You mix your colors, pour your design, tilt and manipulate the board to guide the flow—and then you stop. You walk away. The resin cures on its own schedule, not yours.
Essential Tools and Materials for Surfboard Resin Art
Before you pour your first design, you need to understand your materials. Each component serves a specific purpose, and choosing the wrong resin or skipping safety equipment can ruin your work or compromise your health.
Resin Types
Most modern surfboard artists use epoxy resin rather than polyester resin. Epoxy is stronger, more flexible, produces fewer toxic fumes, and yellows less over time. It's also more forgiving for beginners—slightly longer working time, easier cleanup, better adhesion to foam. Polyester resin is still used by some traditional shapers, but for surfboard art specifically, epoxy is the standard.
Pigments and Colorants
Use resin-specific pigments, not acrylic paints or food coloring. Resin pigments are formulated to mix without disrupting the chemical cure. You can buy pre-mixed tints or create custom colors by blending pigment pastes. Start with primary colors (cyan, magenta, yellow) plus white and black—you can mix nearly any color from these five. Ocean colors typically require multiple blues (cobalt, turquoise, navy) and greens (seafoam, jade, forest).
Safety Equipment (Non-Negotiable)
Resin fumes are toxic. Even "low-VOC" epoxy resins release vapors that can cause respiratory irritation, headaches, and long-term health issues with repeated exposure. You need:
- Respirator with organic vapor cartridges (not a dust mask—those don't filter fumes)
- Nitrile gloves (latex breaks down in contact with resin)
- Safety glasses (resin in your eyes is a medical emergency)
- Long sleeves and pants (skin contact can cause sensitization over time)
- Proper ventilation (cross-breeze, exhaust fan, or outdoor workspace)
This isn't optional equipment. Resin demands respect. Artists who skip safety gear often develop chemical sensitivities that end their careers.
Setting Up Your Workspace: Safety and Environment
Temperature and humidity affect how resin cures. Too cold (below 70°F) and it may not cure properly or will take days instead of hours. Too hot (above 85°F) and your working time shrinks to minutes. Ideal conditions: 75-80°F with moderate humidity and good airflow.
Work outdoors when possible, or in a well-ventilated garage with doors open and a fan exhausting air outward. Lay down plastic sheeting or cardboard to protect surfaces—resin is permanent once cured. Have your board elevated on sawhorses or a work stand so you can tilt it without touching wet resin. Keep paper towels, acetone (for cleanup), and extra gloves within reach. Once you start pouring, you won't have time to hunt for supplies.
The Step-by-Step Process: From Blank Board to Finished Art
This is where theory becomes practice. How to paint surfboards with resin follows a sequence that balances preparation, timing, and intuition.
1. Surface Preparation
Start with a clean, dust-free surface. If you're working on a freshly shaped foam blank, it should already be smooth. If painting over an existing glass job, lightly sand with 220-grit sandpaper to create tooth for adhesion, then wipe down with isopropyl alcohol. Any dust, oils, or debris will show up in your final piece as imperfections.
2. Mixing Your Resin and Colors
Follow manufacturer ratios exactly—typically 2:1 or 3:1 resin to hardener by volume. Use graduated mixing cups and measure carefully. Mix thoroughly for at least two minutes, scraping the sides and bottom. Pour your mixed resin into smaller cups and add pigments, mixing each color separately. Start with small amounts of pigment—you can always add more, but you can't remove it.
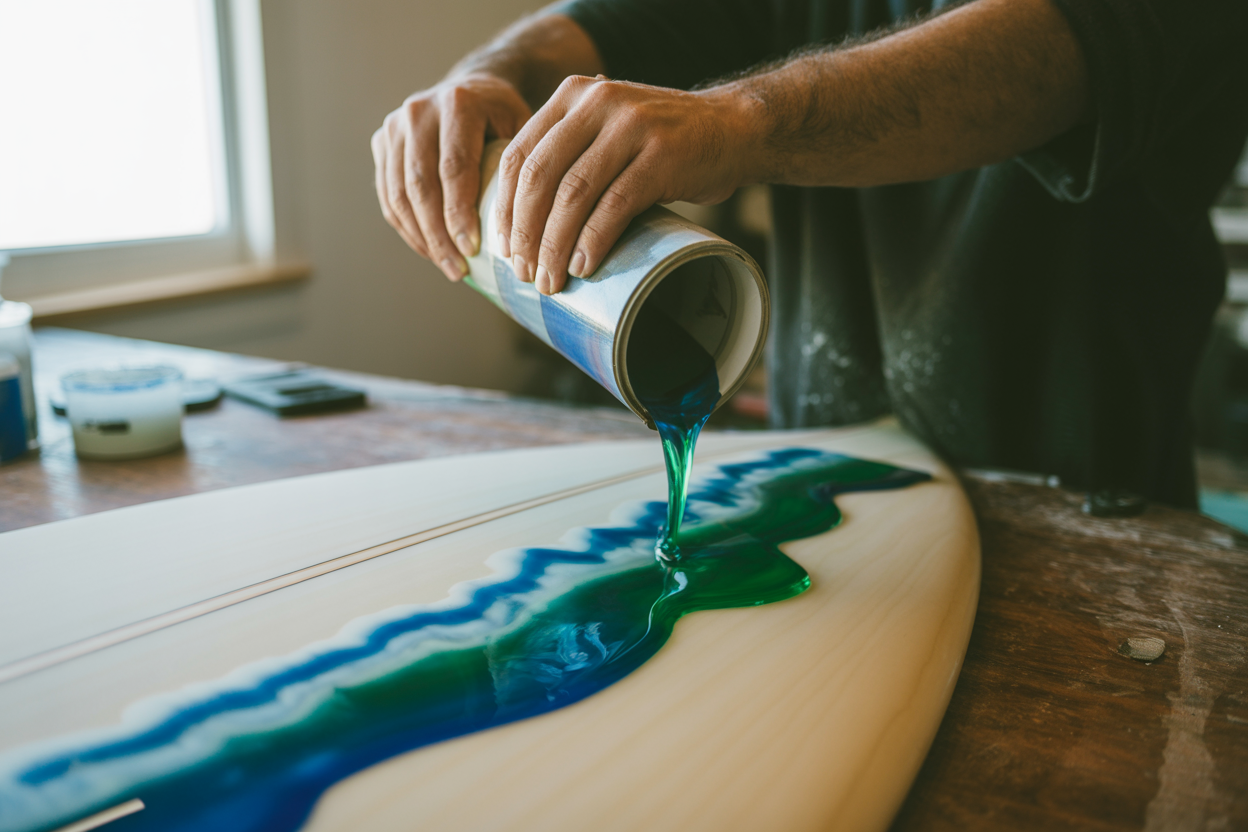
3. The Pour
This is the moment of commitment. Pour your colored resin onto the board in strategic spots—not random, but guided by your design concept. For ocean waves, pour darker blues near the rails, lighter aquas toward the center, whites where foam and whitewash would naturally appear. Don't over-pour. Resin spreads as you tilt the board, and too much will drip over the edges.
4. Tilt, Flow, and Guide
Lift one rail of the board, tipping it to let gravity pull the resin across the surface. The colors will blend at their edges, creating organic gradients. Rotate the board, tilt different directions, let the resin flow and pool. You can use a palette knife or stick to gently push resin into specific areas, create swirls, or pull colors into patterns. But don't overwork it. Resin has its own logic. Guide it; don't force it.
5. Walk Away
Once you've achieved your design, set the board level and leave it alone. Cover it loosely with a plastic tent to keep dust off while allowing airflow. The resin will cure over 12-24 hours depending on temperature. Resist the urge to touch it, adjust it, or "fix" anything. What you poured is what you get.
Common Mistakes and How to Avoid Them
Rushing the mixing: Inadequate mixing creates soft spots that never fully cure. Mix for the full recommended time, even when you're anxious about the clock ticking.
Working in cold temperatures: Resin thickens and becomes sluggish below 70°F, making it harder to flow and blend. If your workspace is cold, use a space heater or wait for a warmer day.
Overworking the resin: As resin begins to cure, it gets tacky and stringy. If you keep manipulating it past this point, you'll create visible brush marks, ridges, and texture you didn't intend. Know when to stop.
Not planning the design: The best resin pours look spontaneous but are actually carefully planned. Know your color palette, know where you want darks and lights, know what you're trying to evoke before you mix the first cup.
Advanced Techniques: Beyond the Basics
Once you've mastered basic pours, you can incorporate inclusions—pieces of rice paper with Hawaiian kapa patterns, fragments of fishing nets found on the beach, actual sand from your favorite break. Embed these in the resin while it's still liquid, pressing them flat so they're encased when the resin cures.
You can also layer resin pours. Complete one layer, let it cure fully (24-48 hours), lightly sand the surface, then pour another layer on top with different colors or patterns. This creates dimensional depth, like looking down through water to coral and sand below.
Masking with tape allows you to create sharp lines and negative space—geometric patterns, horizon lines, color blocks. Apply painter's tape to your board, pour resin up to the tape edges, let it cure, then remove the tape to reveal clean divisions.
Finding Your Artistic Voice in Resin
The technical process is just the beginning. What separates functional glassing from art is intention—what you're trying to say, what feeling you're trying to capture, what story you're embedding in foam and fiberglass.
The artists who make up the North Shore surfboard art community didn't learn this craft from textbooks. They learned by doing, by failing, by understanding that every mistake teaches you something about how resin moves, how colors interact, how temperature and humidity and timing all conspire to create results you can guide but never fully control.
"Resin teaches you to let go. You can plan, prepare, practice—but the ocean doesn't care about your plan. Resin is the same. It moves like water. Your job is to work with it, not against it."
This is craft that connects to place. Every custom surfboard art piece carries the environment it was made in—the salt air, the trade winds, the proximity to the ocean that inspired both the board's shape and its decoration. Learning how to do resin art on surfboards isn't just about technique. It's about understanding the culture that created this art form, the surfers who trusted artists to transform their most essential tool, the lineage of shapers and glassers and painters who've been doing this work for generations.
Start small. Practice on scrap pieces of foam before committing to a full board. Join workshops where local artists share their techniques. Respect the materials, respect the process, and understand that mastery comes not from one perfect pour, but from dozens of pours where you learn what works, what doesn't, and how to see beauty in both.

